Navigation
Install the app
How to install the app on iOS
Follow along with the video below to see how to install our site as a web app on your home screen.
Note: This feature may not be available in some browsers.
More options
Style variation
You are using an out of date browser. It may not display this or other websites correctly.
You should upgrade or use an alternative browser.
You should upgrade or use an alternative browser.
Artful Homemade Quilts Have A Way
- Thread starter freedombecki
- Start date

beautress
Always Faithful
Finally, someone did it in another color schema as well:

beautress
Always Faithful
This morning, I was doing laundry, when my eye caught a quilt square in a closed plastic box. When I opened the box, I noticed that it wasn't a square at all, it was the folded quilt top I lost about 3 months ago. lol Well, I took it out, and it was an 8-point "star" arranged from regular log cabin squares, and it was just multicolored with lights on one side and darks arranged to be the "points" on the small 16 - block small quilt start. So, I thought, hm. there seem to be a lot of red bundled in some of the points, , but not many reds on the longest logs (which touch the outside of the quilt. So instead of putting the usual light row around the edges, I put a red shoe and deer track print left over from a scrap of red I bought last year or the year before at the local quilt shop post-Christmas fabrics sale. Okay, I was a penny-pinching scrooge one January and was vulching on half-price pretty Christmas fabrics nobody bought the months before. 
That said, I cut two 1.25" strips for the sides and two 2" strips for top and bottom, just to give a little extra length. I had saved a stack of miscut logs 3" sometime last year and sewed them into a future quilt border. So voila! they were guilelessly stitched to the red foot-track material, all finishing a one-inch width, so no change to the length with that row. I knew I had to make up for it not being long enough, so I picked a bright yellow and a blue/grey/beige/yellow double-dot fabric, and saw the benefit of sewing on the bright yellow marbled fabric to the 3" pieced border that was attached to the bright red track fabric. b-z-z-z-z (my machine sewing the yellow pieces on). Then, I made sure the top and bottom were plenty longer by sewing on strips 3" top and bottom and 5/8" side by side. and measurements at that point said I needed to not use as much of the dots as I was thinking about, so I rotary cut two more 1.25" sides and a 2" top and bottom that would add an itsy-bitsy more to the length of the quilt. Finally, I found 15 inches of a cute outer-space characters on royal blue piece of quilt material, and decided 3.5"x4=14" which would give me some breathing room on the 15" strip with nothing to spare. So I blissfully cut 3.5" pieces and decided to sew the first two pieces to the sides to make sure everything worked out ok. Well, doh, I was so taken with the larger pieces of the dots, I started sewing the 3.5" royal blue outer space to the widest dots, and when done, I noticed I had sewn the top and bottom first, not the other way around. And due to unforeseen tragedy, it was 6" shy. I noticed a zoo fabric on light yellow that had gone to making a charity bib for the baby care center near the university, and that there were 4 animals that would fit onto the corners if cut 3.5" each, so I sewed them onto the corners with less than an inch to spare at either end of the outerspace borders. So a silly alligator, a leggy octopus, a squarish purple yak, and a white unicorn were sewn inbetween 2-eyed, 2-horn lime green aliens in itsy bitsy red and green flying saucers became watched over by cute and silly animals in the corners of this weirder and weirder scrap quilt. When done, there were 5 borders--red, little bricks, yellow, sanguine dots, and flying people eaters in various shades of lime, green, red, and all on a royal blue outer space fabric to go around the central star. It was fun and done from morning to just before I got here.
That's my quilt story, and I have another top to take to charity bees. Last week I got two or three small tops done, except I wanted to run into a couple of kid prints to liven up the dour greens of one quilt and a patriotic something to add to the red log and blue bordered windowpane quilt. And the yellow quilt start I found last week has faded somewhere into the abyss of my sewing stash in which room, I do not know. I was going to take the cat to the vet today, but I'll have to do that tomorrow or Wednesday. Decisions, decisions. It's hard to make them when my husband cheerfully made the decisions for the better part of 44 years together before he died. I've been missing him a lot lately, but after having had pneumonia nonstop for several months and this month's new case of bronchitis, the longing is nagging at my waning strength.
beautress
Always Faithful
Completed a top earlier this morning, worked on red checkerboards some more, went out to mow. Session ended when the zero turn went over a hidden log and high centered, turning the little workhorse off for good.  Called brother to come and he will be here this weekend to help dislodge it. Everything is a little mucky. That's the long and short of my little quilt effort today, may do another couple of red and tan squares to keep up before retiring.
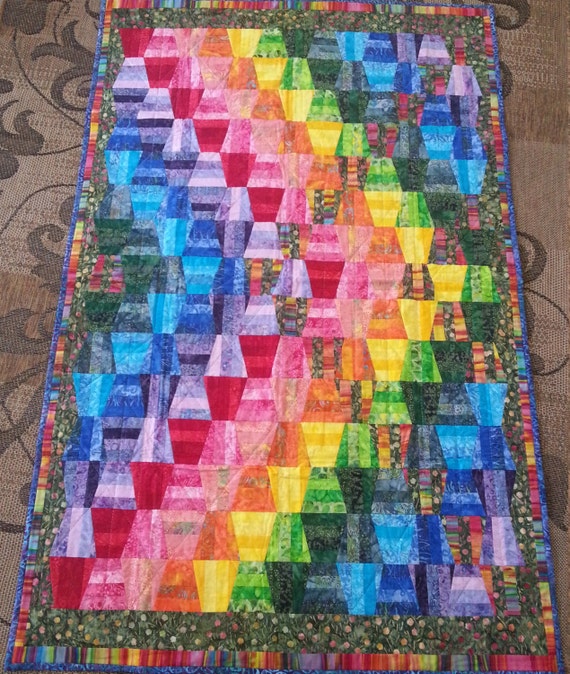
Here's a really pretty quilt I found a few weeks ago:

Called brother to come and he will be here this weekend to help dislodge it. Everything is a little mucky. That's the long and short of my little quilt effort today, may do another couple of red and tan squares to keep up before retiring.Here's a really pretty quilt I found a few weeks ago:
beautress
Always Faithful
Today, I put a blue border around the checkerboard quilt, which makes it cot-sized. I also put hot pink polka dots around a hot pink and very bright yellow 4x5, 20 squares log cabin baby girl quilt, arranged in fields and furrows. Between the log cabin squares and the hot pink dotted fabric, I placed a cutsey dark green strip with yellow and pink blossoms packed, but scattered. The green beautifully separated the squares from the huge pink polka-dotted material. I was so pleased to have done 2 finish-ups today, that I thought "haven't used all those megabucks I spent on 1/8" thick templates, so found an "Elisa's circle," which divides the circle around a circle in four parts, so the template is a great big 8" block you can do two ways. I have several colors of quilts (8 in all) ready to go to Charity bees closet in 2 weeks from Tuesday, but orange, I hadn't done in a while. I had a solid bright orange and a multi-orange-yellow maple leaf print on white that I decided to cut out, so cut out I did. Then I took 4 of the Drunkard's path quarter circles, 2 with maple leafs on the concave and 2 with the bright orange concave. Each is paired with the opposite fabric on the outside and in, which gives each 4-block circle a kind of harlequin effect. The squares are 8", the squares form 16" blocks for a full circle in the middle. It took more time than I wanted to spend, but the overall effect was worth it. Now, just 5 more 16" blocks, and the inner part of the baby quilt will be 32x48 inches. It should be fun finding a woodgrain to go between the solid orange and maple leaf print, but no, that would lower the harlequin effect, so if I want it bigger, I'll deal with that when all 24 squares are joined into a 6-block baby quilt. I haven't worked with circles in ages, and found a smathering of all kinds of circles from teensy to large and picked the large one to get back in the swing of doing anything but the cabins and strings I've used for making quilts for the last few years, few exceptions, but occasional exceptions. Well, miles to go before I sleep today. Will leave some orange samples below.
cutting

Modern arrangement of quartered circles, Orange and Grey theme

Modern arrangement of quartered circles, Orange and Grey theme
beautress
Always Faithful
Just some more fun ideas from my bing experience today...
beautress
Always Faithful
Been busy making quilt tops all week. Took 10 tops down to the Charity Bees closet yesterday so wouldn't have to cart them along with supplies, a sewing machine, iron and ironing board next week when we meet to sew for a day. I'm now working on a quilt that will look like this minus the white sashing and square solid sets below:

^^Found online by typing in the words 'pastel string quilt.'
I have 8 squares of 24 done so far and embroidered down the ditch area of each strip with
a machine stitch that replicates a herringbone stitch by hand. The embroidery thread is white.
I'm so pleased at the way the first 8 squares have turned out so far. It took 40 hours to
do all that work. It's happy to make a quilt for a poor kid, even if you know you'll never meet them.
I'm just grateful to have 40 happy hours.
beautress
Always Faithful
Well, my blocks are smaller, but the pastel quilt is on its way. I expanded it to five across, omitted the sets and sashes, and now I have to do 2 more double rows of 5 across for 30 squares. It's gonna take a lot of time, and I have to go to a birthday party tonight, which means2 hours of drying my long hair after washing it good. lol Last Monday I took 10 small quilt tops to the Charity Bees closet that were completed in 4 weeks time, working nearly constantly. I haven't done much quilting since Tuesday, when I sewed together 20 squares. Oh, goodness. It's going to be 40 squares. They're only 7" across each, before stitching together, and every block has thousands of machine embroidery stitches to the ditch area between the strips. I may have to set this quilt top aside and get some quickie baby quilt tops done to show in June's 3rd Tuesday meeting, if everyone's not on vacation then.
Hm. If I just added one more strip of 5 inches, (5x5), my quilt could just be for a newborn like this one (similar structure, different fabrics)

Oh, my goodness. What a cute quilt template this quiltmaker has. I want one!")
She didn't sweat out embroidery, and it's just as cute as pie.
Oh, my goodness. What a cute quilt template this quiltmaker has. I want one!
She didn't sweat out embroidery, and it's just as cute as pie.
beautress
Always Faithful
And this has strips and squares! Too cute! It's fun to go online and see what everyone else is doing.

beautress
Always Faithful
Oh, hay! This one's 2" strips probably, and didn't take too much thinking, just furious sewing with her petal to the metal kinda piecing and quilting straight lines.

beautress
Always Faithful
Scrap quilties!
beautress
Always Faithful
And another you could do up for a baby in no time! Might as well since they just barf on them anyway ... (and worse) ...

beautress
Always Faithful
Yo, baby! I already have enough 2-strip patches made to do a small version of this quilt, and it would only take a day or two to get them put together...

I will have to cut out some solid color strips to cut into white (or other color) squares. I see 4 identical rectangles, do you?
Quilters are mathematicians and geometric artists, you know.
I will have to cut out some solid color strips to cut into white (or other color) squares. I see 4 identical rectangles, do you?
Quilters are mathematicians and geometric artists, you know.
beautress
Always Faithful
I have the Tumbler Template! This Layout looks easy! You could just use a strip of 5" on a 5" tumbler templateThe cutting is simplified if you know the length of your symmetric tumbler then it's just zip, zip zip with a rotary cutter!

And to make the border, you just take a sharpie, mark the center at top and bottom, put a ruler on and draw a straight line, and there's your outside border, simpler than pi.
beautress
Always Faithful
Just using some other people's ideas on how to use the tumbler template:


Endless ways to tumble around!
Endless ways to tumble around!
beautress
Always Faithful
I cannot tell a lie! I love this lady's version of the Tumbler...

And this one..

And a few more...
USA! USA! USA! USA! USA! USA! USA! USA! USA! USA! USA! USA! USA! USA! USA! USA! USA! USA! USA! USA! USA!


USA! USA! USA! USA! USA! USA! USA! USA! USA! USA! USA! USA! USA! USA! USA! USA! USA! USA! USA! USA! USA!


USA! USA! USA! USA! USA! USA! USA! USA! USA! USA! USA! USA! USA! USA! USA! USA! USA! USA! USA! USA! USA!
And this one..
And a few more...
USA! USA! USA! USA! USA! USA! USA! USA! USA! USA! USA! USA! USA! USA! USA! USA! USA! USA! USA! USA! USA!
USA! USA! USA! USA! USA! USA! USA! USA! USA! USA! USA! USA! USA! USA! USA! USA! USA! USA! USA! USA! USA!
USA! USA! USA! USA! USA! USA! USA! USA! USA! USA! USA! USA! USA! USA! USA! USA! USA! USA! USA! USA! USA!
beautress
Always Faithful
Top left is amazing. I like how the tumbler effect goes into a straight border with matching colors. Just me and thank you.
You're right, Erinwltr. It's a strip quilt and right up my alley. I have strips these colors, working on a kite quilt (in some box, somewhere...), but I think I used the control system, which means I did each kite one at a time. They just need to be put together. If I'd had a brain, I would have made long strips of what I cut the kites from instead of the snail-paced one at a time method that leaves me with 30 kites, no quilt in sight, because putting it together is not only very challenging with sky blue between the kites, I selected rows that are very difficult to sew together considering all the tops and bottoms of the kites being sewn together leaving 90-degree angles at top, and 45-degree angles at the bottom. They then have to be sewn together to match to make the overall type quilt I started, then they have to be absolutely perfect with absolutely perfect sky pieces separately sewn. That means endless pinning, lol
But any way you cut it, this gal made an amazing piece of art! And I love it too!
beautress
Always Faithful
Here are some Quilter's Tumbler Templates:


The good thing about a template: just cut a strip of fabric 6 1/2" if you're making 6" tumblers. The bad thing is, templates are a bit on the expensive side.
The other good thing about the acrylic templates show above, is that the symmetry of most professional acrylic templates is such that you just turn them a hundred and eighty degrees, and they line up straight on a straight-cut strip.
And another good thing about tumblers is that you can stack different fabric strips exactly on top of each other and move down the line cutting up to 20 layers thick if you have a 60 mm rotary cutter and a good cutting mat below with inches delineated. And the good thing about you tube, is you can probably see an expert making the kind of template quilt you want if you just load 3 words in "acrylic" "quilt" and "template" in that order, sans the quotation marks at you tube. I'll se if it works and post one below:
OK, I loaded in the phrase, "acrylic tumbler quilt template instructions" and got no less than a dozen how-tos from cutting to making and some complete from start to finish! I'm just picking the one I like. Remember, if you do this, your first quilt will likely take you a month. After that you can get larger templates and make a truly magnificent modern quilt top in a day. Don't buy the batting until you have square corners for your first attempt at quilting. Or you can go for the wavy-edge version ONLY IF YOU HAVE PERFECT INSTRUCTIONAL HOW-TOS on you tube or a quilt store that carries quilt videos and dvds.
beautress
Always Faithful
This tipsy tumbler method is way cool, and first timers will enjoy it. Wow. I could make the blue sky on my kite quilt pretty much the same, except using 14" rather than 10" squares. :lala:


Similar threads
- Replies
- 20
- Views
- 213
- Replies
- 0
- Views
- 92
- Replies
- 47
- Views
- 848
New Topics
-

-
-

-
 The latest greatest antics of our elected representatives is the so-called Save Act.
- Started by Dante
- Replies: 17
-
